Celtic Knotwork: the ultimate tutorial

2. The basics

All the versions of this article: [Deutsch] [English] [Español] [français] [עברית] [italiano] [Português do Brasil]

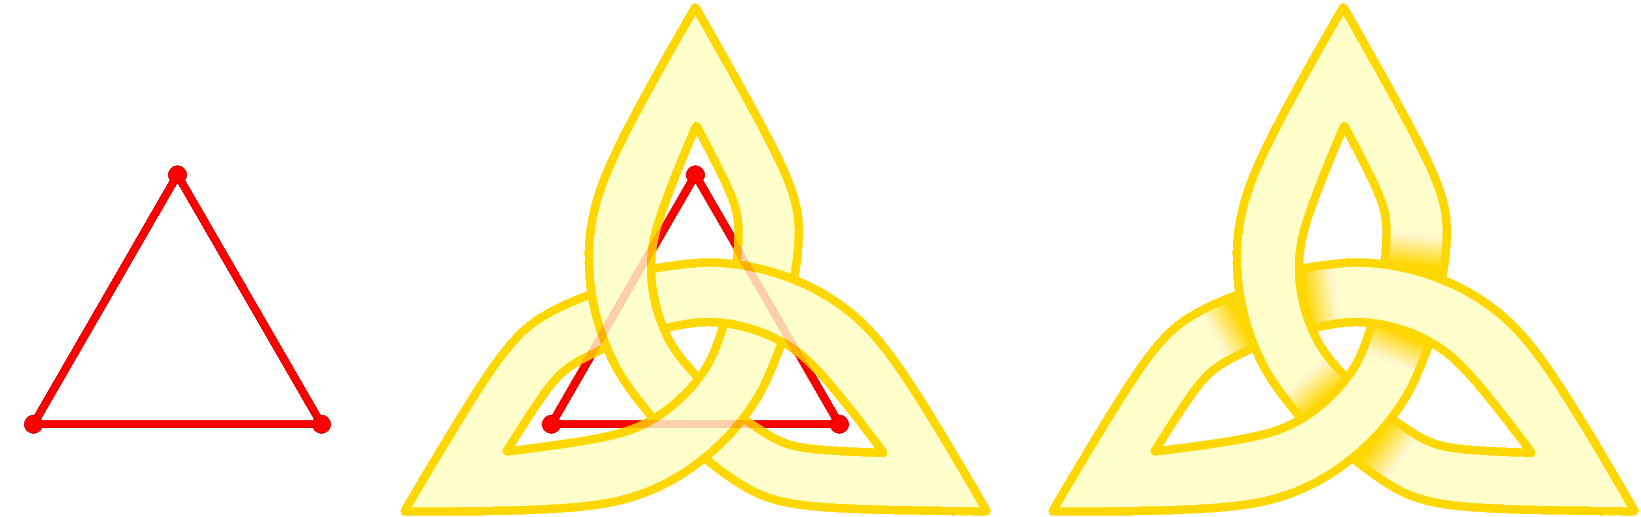
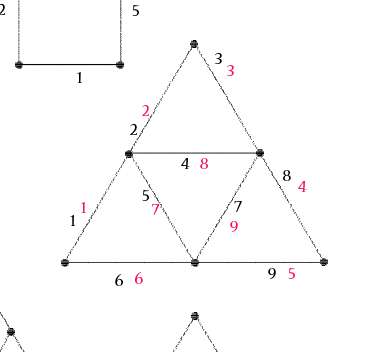
Each graph on the plane codes a knot or a link. For example, the triangle codes the trefoil knot:

Graphs are very easy to produce. A large class of them is even called "dessins d’enfants" (children’s drawings) by mathematicians (it’s my profession). Here is a graph:

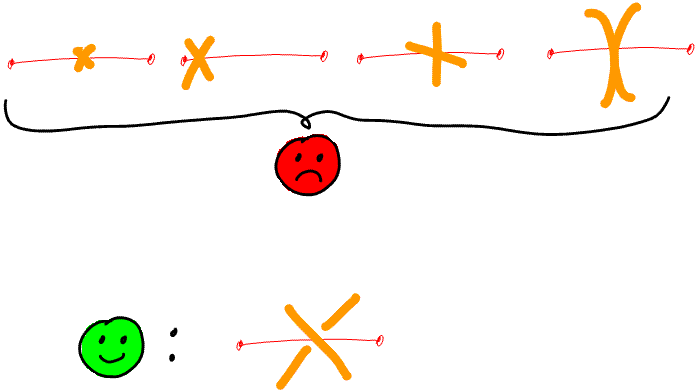
Its knot is a symbol of the Ming dynasty. The process to draw the knot it codes is in four steps:

  1. Put a crossing on the middle of each edge.
  2. Connect the bits of threads to one another.
  3. Sort out the over/under pattern.
  4. Thicken your design.

Here is another example:

But let’s go back to a step by step on the Ming symbol. First, put a little crossing on the middle of each edge:

It is important to draw the crossings neatly so that there is no doubt about the direction a bit of thread points to. In particular, don’t simply tick the middle of the edge.

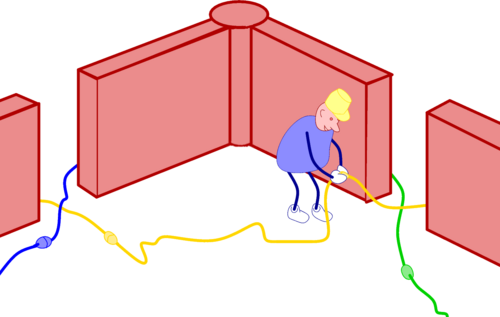
You have to connect these bits of threads to one another in order for them to flow nicely without beginning and end. To do that, think of your graph as being a maze where each edge is a wall with an open door in the middle, where the crossing occurs. 
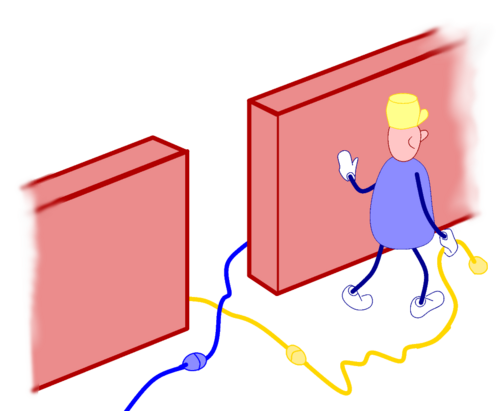
Choose a bit of thread, it points in a given direction. Follow the wall in that direction, turn the corner, follow the wall until you reach another crossing. One of its threads points towards you, it’s the one to connect to.

At this stage, you need to straighten things a bit so that each thread flows nicely. But don’t do it too quickly, don’t try to guess too fast as mayhem will occur. So don’t be too smart and apply the rules.

Third, at every crossing, you have to decide which thread is over and which is under. You could set the first one arbitrarily and then follow it, under then over, then under, changing its status at each crossing along the way. That may work for small designs but it is unmanagable for larger knots. You end up with inconstistencies between parts of your drawing.

Fortunately, there is an easier way:

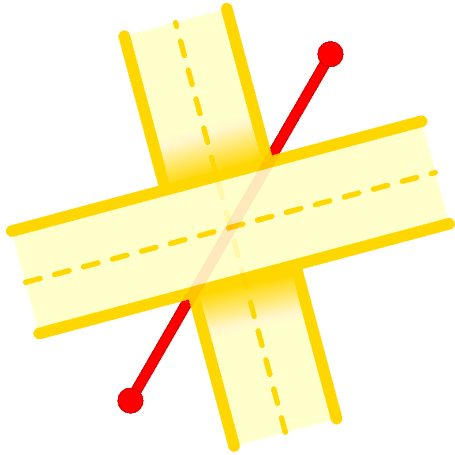
Draw this little guide on a corner of a page and rip it off. Then, for each edge of your graph, place your guide alongside with both edges aligned. It will decide for you which of the two threads is over.

Another way to look at it is to choose an edge, align that edge with your view, figuring yourself standing on a vertex and looking straight at the edge. Then, among the two threads crossing in front of you, one comes from your right, the other one comes from your left. Figurez yourself holding these threads with both hands, then cross your arms with (say) the left one above the right one.

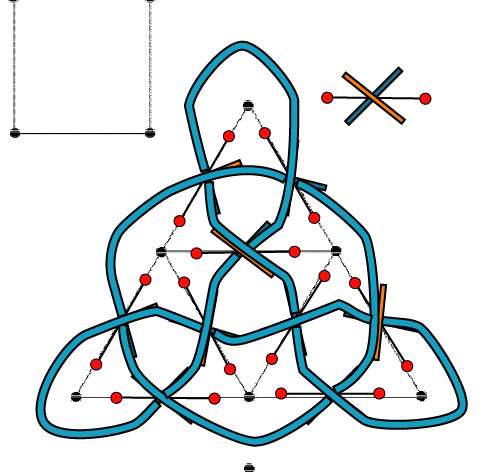
Then inflate your knot. Think of the thread you just draw as the yellow line at the middle of a road, you need now to draw the left and the right side of the road. Be careful that at each crossing, there is a bridge, a road goes under the bridge and the other goes over. You should start by underlining the bridges so that you know where to start and where to stop.

Now you are ready for some exercices.

28 Forum messages

  • The basics 4 September 2006 03:58

    I have been messing with knots for years, but this is by far the simplest instructions I’ve found. Thanks!!!!!!!

    Reply to this message

  • The basics 30 October 2006 21:08

    I am a school teacher and this is the easiest way to explain the process to students. Thank you for your kindness in sharing.

    Reply to this message

  • The basics 10 December 2006 06:10, by Abigail

    THANK YOU SO MUCH!!!!!!!!! I have always wanted to learn how to draw knotwork and now i can thanks!!!!!!!!!

    Reply to this message

  • The basics 15 December 2006 22:46, by Sammy

    Thank you so much for this simple way to make knotwork. I’ve been looking for books on this subject for years but had no luck untill now. Promise never to close this site!

    Reply to this message

  • The basics 3 January 2007 13:12

    I have just been set as part of my art course celtic knots and i hadn’t got a clue how to do them, this has helped SOOOOOOOOOO MUCH!!!! thanks for the help and the instuctions are really easy to follow!!! THANKS AGAIN!!!!!
    Emily

    Reply to this message

  • the Ultimate Tutorial for Celtic Knotwork 5 June 2007 19:36, by The Designing Woman— Karyn Jeffrey

    You aren’t kidding!! It is great...Thanks so much for helping this poor artist/calligrapher get a grip on a wonderful image making tool! I really appreciate your generosity in sharing the process—Thnk you, thank you, THANK YOU! The Designing Woman—Karyn Jeffrey

    Reply to this message

  • The basics 24 June 2007 09:22

    I have just found this site. I have always been interested in Celtic knot work and thank you for sharing this. I hope to keep practicing and the instructions are very clear to me as i have suffered a stroke.

    Reply to this message

  • The basics 22 September 2007 23:54, by Cindy

    How do I tell what direction to turn? I tried doing the sample on this page a few different ways. Some of them left loose ends, so I quickly eliminated those, but I also made a knot that looks like the one on this page rotated ninety degrees.

    Reply to this message

    • Turn in the right direction :-) 23 September 2007 18:32, by Christian Mercat

      Dear Cindy,

      If you don’t know in which direction to turn, it means you haven’t drawn your crossing neatly enough.

      If you draw your crossing as shown in green :-), you will know in which direction your thread is heading. If you draw your crossing as shown in red, you will hesitate and have thread that tend to get loose ends or that try to go through walls. remember that the crossings that you draw at the first stage are the only ones! Afterwards, the thread is not allowed to cross the edges.

      Reply to this message

  • The basics 15 January 2008 18:29, by Confused person

    You make these drawings sooo confusing.

    Reply to this message

  • The basics 3 February 2008 20:31

    i can’t grasp any of the celtic drawings! Its for art homework and i am really stuck! What can i do?

    Reply to this message

  • The basics 14 March 2008 17:55, by Caroline

    Help! I don’t understand how to decide which strand is over and which is under!!!

    Reply to this message

    • Follow the guide 14 March 2008 20:18, by Christian Mercat

      Dear Caroline, the guide will help you, identify the edge of your graph that you want to decide, align the edge of the guide (in red) with it et voilà, the guide tells you which one of the two threads is going over, which one is going under. A very common mistake is that you can no longer identify or see the edge because you erased it or because you drew the link in the same color. Be aware that the Irish monks never erased these edges, they simply covered them with paint. So draw your graph in ink and don’t erase it, place the crossings (with an erasable pencil) at the middle of it and nowhere else. Every edge has a crossing, every crossing takes place on an edge and you’ll live happily ever after.

      Reply to this message

    • The basics 16 February 2009 21:17

      The solid lines on your ’x’ is over, the broken line on your ’x’ is under.

      Reply to this message

      • over/under matter of choice 17 February 2009 00:37, by Christian Mercat

        Yes, you’re right, I am not consistent throughout the tutorial, sometimes I make one convention and the next morning I stick to the other one. That’s life :-)

        Really, I should find some time to go through the pictures and flip what needs to be flipped. But ok, if you get as far as understanding that some Xs are wrong, you’re in good shape :-)

        Reply to this message

  • The basics 15 May 2008 21:23, by An expert

    In my opinion this site dosen’t teach you very well because of the comparing to random things like mazes. The animations also make it confusing because of their speed. you oversimplify it and that makes it all the more dificult. So many rules makes it confusing. Find a balance.

    Reply to this message

    • Random? 15 May 2008 22:27, by Christian Mercat

      Dear Expert,

      Thanks for your expertise (I mean it). I understand the animations are too fast. I shall work on them, preferably during this lifespan...

      As for the randomness of mazes, a maze is as random as a knot. If it is random, it means that whether you are lost in it or the designer doesn’t know what (s)he is doing. But once a good plan is set, according to rules that I am trying to explain in this tutorial, especially in the taxing "encapsulation" section, you should be able to design awell thought knot and you should not be too surprised or lost in it. And it is the same thing with maze design.

      The connection between mazes and knots is that you can sort your way out with only local reasonning, without having to grasp the whole picture beforehand.

      Please tell me if you know of a better way to explain things, I have been teaching this subject for only 11 years and I am eager to learn better ways.

      Best regards, Ch.M.

      Reply to this message

      • Random? 16 May 2008 03:23, by The expert again.

        You did everything almost prefectly except for the quick animations and a few words that are hard to understand.
        Also try using 2 or 3 examples instead of just 1. I noticed over the years 2 examples help more people than one.

        Reply to this message

  • Question about the exercises 20 May 2008 12:26, by Piffy

    Thanks for the tutorial. I tried this a few years ago and didn’t do too well. It’s clearer now and still much clearer than my George Bain book.

    I have a question about the exercises. How do you decide what route to take through the more complicated shapes? There are sometimes multiple ways through and so I don’t understand the choice you make at a three way junction. Here are two routes for one of the shapes above, one numbered in red and one in black. There’s probably more. Am I missing something obvious?

    Thanks :)

    Reply to this message

    • Multiple route? No, the tao is the tao :-) 20 May 2008 14:03, by Christian Mercat

      Dear Piffy,

      Thanks for you post. I love George Bain and Aidan Meehan books, they are great inspirations. But on the theoretical side, indeed, some little things can be added to them.

      If you have the impression that there are several routes to take, it means that you are wandering in the open space, I mean your little buddy, having one thread in one hand, should have the other hand touching the wall and not losing it! until he comes to another bit of thread where one is pointing towards him, that where to connect. TINA, There Is No Alternative, TAO, follow the path :-)

      There are no three way junctions if you do exactly like the happy face below:

      Then each thread comes for a 4-points junction where each thread is definitely pointing in one direction where you can follow a wall until you reach another door with another bit of thread pointing to you. You should never make another bit of thread when reaching a crossing, use the ones which are already there. If you wrongly draw like the 2 last unhappy faces, you don’t know where to go to and when you come to the crossing you think you should connect to, you don’t know which bit you should use and maybe you create a fifth one? Then, chaos occurs.

      Please send me an example and I’ll correct it (with a public spank ;-) easy, that’s not my style!).

      Reply to this message

      • Multiple route? No, the tao is the tao :-) 20 May 2008 15:24, by Piffy

        Thanks again :) I did the experiment too, where I followed both the routes for laying down my crosses and whichever way I did it, the over and unders ended up the same. It looks like even if I don’t quite understand the concept, following the method gives the desired effect anyway which is all I really need I guess. Perhaps the concept will follow later.

        My completed attempt (Scruffily doodled in Illustrator) shows that I got there in the end so no spankings required after all ;)

        Reply to this message

        • No spanking 20 May 2008 15:30, by Christian Mercat

          Yes, following the method, you got:

          JPEG

          which is a great "début"! Congratulations, you got the idea. By the way, the red circle you draw are supposed to be the end vertices of the edges, already painted black, but it’s interesting to draw it this way!

          Best regards, Christian

          Reply to this message

        • Multiple route? No, the tao is the tao :-) 18 September 2011 03:34, by kxLucIaChGFlNkC

          Now I’m like, well duh! Truly tahnufkl for your help.

          Reply to this message

  • The basics 14 December 2009 17:50, by ranga rao

    i am attempting to make a chair cussion with single piece of rope. i saw many useful patterns but unable to set a logical procedure to guide the rope into the pattern.
    the method explained here makes me think how to go about a systematic approach to make the cussion.

    i am grateful to the author for indicating a sysstematic approach

    Reply to this message

    • Thanks 14 December 2009 18:50, by Christian Mercat

      Dear Ranga Go,

      Thanks for your nice words. PLease keep us posted of your updates. Keep up the good work, regards, Ch.M.

      Reply to this message

  • The basics 13 December 2010 21:11, by entangled

    the most interesting, before thoushands of years ago, people worked without computer and highschools...
    and todays modern folks not able to follow them...
    dont you all think it is funny? and we call them primitive?

    you all have a great day :-)

    Reply to this message

    • It’s all about mass :-) 14 December 2010 09:53, by Christian Mercat

      Dear Zsigraiv,
      Thanks for your message.

      Well, it’s indeed funny but keep in mind that what was secret and left only to the initiates, mastered by only a handful of scribes, whose purpose in life more or less was the mastery of this very specific ornament, is now available for everybody to train. So don’t expect that everybody, without proper focus and training, will get the grip on it in a minute!

      Best regards, Ch.M.

      Reply to this message

Reply to this article

Thursday 17 August 2006, by Christian Mercat

SPIP | template | | Site Map | Follow-up of the site's activity RSS 2.0